Dog Grooming Instructions For Trimming Feet, Hocks And Sheltie Ears
I anticipate closing this website and completing a full transition to my substack account by the end of the year. Please sign up for the substack newsletter if you wish to stay informed about things going on at Yankee Shelties.
You can also find a link to book grooming/boarding service there. Or just bookmark the customer log in page to your "favorites" list
Starting with the Feet
Having gotten clipping or grinding those scary dog nails out of the way, it’s time to continue the dog grooming instructions by trimming the fur on the feet.
For this portion, get a spray bottle of water or diluted hair conditioner, a pair of shears and a smallslicker brush. If you need to purchase anything, you can go to my page on recommended products and scroll down to the grooming equipment links.
This process of grooming feet, as far as I am aware is pretty generic.
I don't think there are breed specific instructions. Some folks may prefer to use electric clippers on the bottoms of the paws when they trim around the bottom.
I used to prefer scissors... recently I've started using small clippers to finish up the trim.... never to old to learn new tricks!
OK, so get your clean pup up on a table and let's begin the dog grooming instructions.
Step 1.Spritz the hair on the feet. It will help the hairs stand up for brushing and trimming. Step 2.Brush the coat in the opposite direction that it grows. I personally find small slicker brushes do best for this part of grooming. It lifts and separates the hairs better than a pin brush. I have used a variety of brands and the one pictured below is a Bass Soft Small Slicker Brush that I have used and like. It is available for sale in the Yankee Shelties' Shop |
  |
Step 3.
Trim any hair standing higher than the majority of coat on the feet. Give it a nice curve front to back and side to side if you can. When you are done, gently slip a finger between each toe to brush the coat down to the underside. |
 |
Step 4.On the bottom of the feet, trim the hair between the toes with a scissor so it is level with the pads. Puppies have especially soft pads so be careful not to accidentally snip them. Do be careful how you are handling your pup's feet. Sometimes novices get so engrossed with maneuvering the scissors while grooming, that they forget the angle they are holding the feet. You really don’t want to try to twist the pup's leg off. BE GENTLE. While he may be squiggly in the beginning, as you continue with your practice over the weeks and months, he will learn to be pretty cooperative. Close enough for Jazz, as an photography instructor of mine used to say. See that pink coloration to the coat? Probably a fungal growth. You can use any foot antifungal cream, spray or powder. |
  |
You can also go the natural route and use diluted white vinegar, hydrogen peroxide and water. Saturate the foot and let it air dry.
Step 5.With your thumb under the two front center toes and against the front pads gently press against the pads. This in essence, retracts the toenails allowing you to trim in front of the nails a little more precisely. This step of the dog grooming instructions might seem a tad awkward, but yo will get the hang of it and your dog will allow you to manipulate the toes as needed. |
 |
Step 6.
If the pads are dry and cracked, apply some pad cream or Bag Balm. Both Bag Balm and the Davis Pad & Elbow cream work well in my experience. The bag balm is a teeny weenie tube, easy to use on tiny pads or a small 1 oz container. The Elbow cream is large enough to last a long time and better if you prefer to "dip" to get the cream you need.
|
  |
Since you are down around the feet, how about the hocks next?
Dog Grooming Instructions for Hocks
When your sheltie is a companion, the dog grooming instructions are a little different than preparing for a show. You can usually trim a little closer for your pet and still look really good.
With show grooming, we like to leave the coat as full as possible, nice a fluffy all around the hock (lower leg) while still looking neat.
For these tips, all you will continue to need the same two items as for the feet:
- a pair of straight shears
- a slicker brush
As always, you start with a clean Sheltie. If you use your scissors on dirty coat they will tend to get dull much sooner than working with a clean coat. Then you will have the expense of sharpening them.
Some people prefer to stand their Sheltie on a table with the hind feet very close to the edge so they can use the scissors to make a straight cut.
I prefer to have my guys lying down.
Step 1
Take the hock, spritz with water or coat conditioner and brush the coat well to remove any mats.
Just the action of sitting on the hock can mat the fine hairs, so make sure you brush well.
The reason you use a slicker brush is because it separates those fine hairs better then the pin brush.

Step 2
Brush the coat to one side or the other and take your scissors parallel with the hock and trim the coat in a straight line.
Once you do this a few times you can decide just how short or long you want to have the finished effect.
But for now, put the scissors pretty close to the leg, almost resting on it. That makes it easier to cut straight in the beginning.

Step 3
Then brush the coat to the opposite side and again trim in a straight line.


Step 4
Brush the coat straight back from the hock and trim again parallel to the bone.


Step 5
Brush the coat up and to each side to fluff out the hock. TA-DAAA!! You are done with this section of the dog grooming instructions!

Ready to Trim Your Dog's Ears?

Henry before being groomed...
Not looking too happy about it.
It really isn't difficult grooming ears, but you do need a few tools:
A small pair of thinning shears is best, but a pair of straight scissors can be substituted if necessary.
I like to use a small thinning shears:
If you buy shears at the local pet store, I found a long time ago that they didn't cut as much as they just pushed the hair around.
So, I ended up biting the bullet and going for the good stuff. But start at whatever level you feel comfortable.
Second, a small slicker brush to get all the fine hair around those dogs ears combed in one direction. I have the Bass brush (pictured to the right) that works well for me.
Third, a spray bottle with plain water to mist the coat. That will keep the “fly-aways” down, allow you to position the hair where you want easily and minimize hair breakage.
If you have lots of mats behind the ears (and most shelties do), try a conditioner instead of plain water in order to reduce the knotting. The hair behind the ears is very fine and tends to mat easily.
Lastly, a clean coat. Cutting a dirty coat can dull your scissors quicker than clean. Yes, you will have to have your shears sharpened from time to time.
Let's Begin Trimming Those Dogs Ears!
Step 1
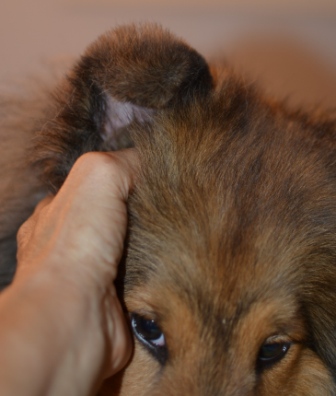
Hold the ear out to the side Yoda style and brush the coat straight out.

Step 2
Once all this coat is nicely separated from the ruff of the neck, brush the coat on both the outside and inside of the ears towards the front.

Step 3
Gently flip the ear up so your thumb is on the inside.
Using your thumbnail, gently slide your thumb in the same direction until you feel the nail slip off the end of the ear leather.
Now you know how close you can get WITHOUT cutting your dogs ears.
This is a good thing.

Step 4
Use your scissors or thinning shears, trimming off pretty close to the edge of the leather in a straight line.
The thinning shears will give it a softer look than straight shears, but either is better than the wacky untrimmed look.
Trimming from the head out to the tip prevents accidently snipping his head.
If you end up with a few stray hairs, you can snip them with straight shears.


Step 6
Take the slicker brush and brush the coat in the opposite direction. Again, use your thumbnail to feel for the end of the leather, trimming the other side, not quite as close as the first.


Step 7
Curl the ear around your index finger, holding on to the tip with your thumb. Brush the coat from the back to front, trimming any hair that is longer than the height of the ear.

Step 8
Brush the coat on the back of the ear.
Gently press towards the center of the head using your thumb.
This gives an approximation of how things will look.
Time for trimming any obviously long, out of place hairs.
(Notice the look I'm getting from Henry, LOL!)
If the hair in front of the ear is long that also can be trimmed, but Henry's is short enough as it is.
Step 9
Reward your pup for a good job and begin on ear #2. Repeat the process

Step 10
Reward yourself for a good job.
Stare at your dogs ears suspiciously for many days looking for where extra snips need to be done. ;)
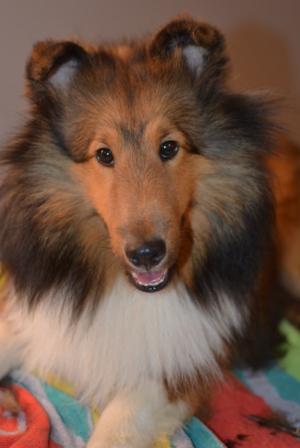
A happier Henry, now that it's all over... or is it??

Trimming dogs ears isn’t difficult. The hard part is making them both look the same J
So how did you do? If it really isn't your cup of tea, I'd be happy to do the grooming for you including trimming those crazy dogs ears. Just give me a call.

